I recently made this render of Tifa as a cute cat girl, but I sort of glossed over the cloth simulation aspect of it until I was asked in a private message how I made the draping of the oversized T-Shirt.
So I thought I’d make a quick post with some extra tips and tricks on working with Daz clothing and Blender’s cloth sim.
If you have not already read it, I would highly recommend reading my previous post about cloth simulation in Blender.
Using Daz DForce Clothing
I use Daz clothing a lot (importing using Diffeomorphic) because the majority of the models I use are based on Genesis 8 (or 8.1) and the clothing fits very easily or is fairly simple to resculpt to fit. It also allows us to use the DForce Pinning weights which are converted for us by Diffeomorphic for our cloth pinning.

Above you can see the weights included for the Boyfriend Shirt. Despite being for DForce I have found the default pinning weights to work well in Blender too.
Here are my settings, for the most part they are the ‘Cotton’ default provided by Blender.
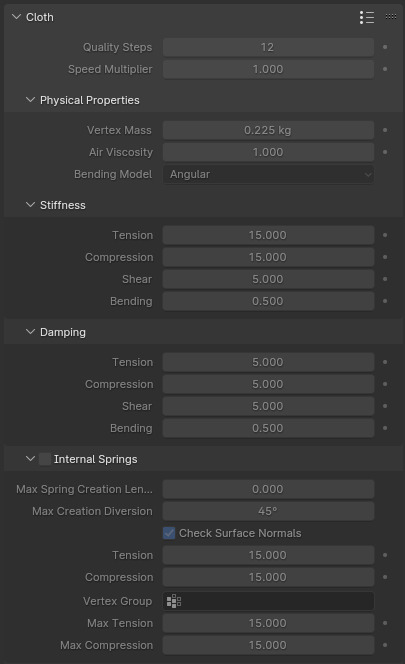
My settings are grey-ed out because I have a baked sim, the settings are still valid though.
I have a Ryzen 7 5700X and this simulation takes around 2 or 3 minutes for 150 frames. You may want to reduce collision quality if you have a weaker CPU, or increase if you have a stronger one.
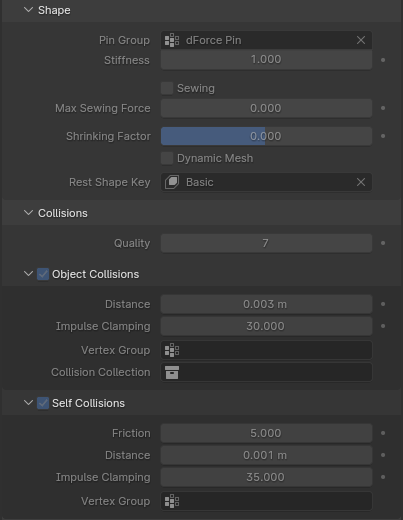
If you wanted to make the shirt look ‘wet’ you could add a little shrinking factor so it will cling to the skin, and also make the vertex weight a little heavier (probably).
Remember that if you are making stills you can ‘Save as Shape Key’ on your cloth modifier to save the simulation, as it is shown in the selected frame, as a shape key.
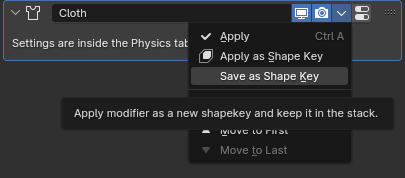
If you do this remember that you will need to disable the cloth modifier, armature modifier and any shape keys that precede your cloth shape key or the mesh will fly off somewhere or be distorted.
Yes! That does mean all your driven corrective shape keys need to be disabled too.
If you need a quick way to mute all your shape keys you can use this small add-on I made with the help of fellow artist Fab3DX and ChatGPT (because Python is not my first language).
Now it’s time for the Frequently Asked Questions round, otherwise known as “Why doesn’t this work for me?”
My Mesh explodes! Help Me!
Try disabling ‘Self Collisions’ then simulate a few frames and check to see if it solves the issue. It does? Then it’s because the mesh is too dense compared to the collision distance. The solution I use is to scale everything involved with the simulation up by 10, run the sim, save the sim to shape key, then re-scale by 0.1. This is convoluted, but it does work consistantly.
The other method I’ve seen suggested is to use a decimate modifier before your cloth modifier, but I never found this worked with this mesh. It is likely because the mesh is quite dense at the bottom hem so even decimation would not help.
Why does this happen? The self collision distance only goes down to 1mm (0.001m) if your mesh has polygons that are less than 1mm in size self collision will occur almost constantly in a lot of cases. I do not know why it doesn’t allow lower, but I have heard things about the error margin on the sort of floating point numbers it would be working with being too large. I do not know how true that is though.
My Clothing Doesn’t Follow The Mesh!
If you’ve previously used a cloth sim, you may have forgotten that you have to turn off Armature modifier visibility. Just mute your cloth shape key and enable the armature modifier, it will snap back.
If you haven’t then it could a few things. Here is a quick list of some common ones I have seen:
- Your cloth modifier is visible and you are not on frame 1 of the simulation.
- Your armature modifier is not visible
- Your armature is not set in the modifier
- Your deformation vertex groups are named incorrectly. For example your clothing has groups with Daz armature bone names instead of MHX or Rigify.
How Do You Deal With Areas Where Skin Touches Skin (Armpits, etc)?
This is tricky. If you use the same technique as my previous cloth simulation article for going from T-Pose to final pose then you can add extra key frames for the elbow poles etc to keep those areas as separated as possible for as much of the simulation as possbile.
After that I have found relying on Inpulse Clamping to prevent the inevitable polygon explosion works well. After the sim has finished and you have your shape key you can then go in with the cloth sculpt brush and masking to fix any visible issues.
It’s definitely not perfect, but it is the best option I have found for stills work. I’m afraid I don’t have any tips for animations other than maybe trying to always keep a gap between skin and skin where the cloth can be without intersection.
I hope this helps if you are struggling with Cloth Sims in Blender. I use them quite often and while I do have the occational issue they work fairly well, as long as you understand (and work within) the limitations it has.
Be First to Comment