
You’ve got your scene in mind, and now you need some props pronto. Importing Daz props is a good method to get a large array of good quality props.
Daz props are widely available whether they be humanoid, non-humanoid, environmental and general props and for the most part are very affordable.
How do we get them into Blender easily without any of the FBX, DAE or OBJ export faff? Well that’s what this article aims to show you.
Important Note
You should be somewhat familiar with Blender and have Daz with a content library already set up. Setting up the plugin is the most time consuming section of this, imports are generally simpler after that initial set up.
Diffeomorphic: Daz Importer
This magic add-on/script comes to the rescue. It can seem very complicated, but don’t worry. Once set it up is pretty easy to use (most of the time).
First head to the Diffeomorphic website and download the zip file. You can either click the ‘stable’ version link on that page or follow the BitBucket link to grab the bleeding edge version.
Why Diffeomorphic?
There is an official Daz export tool available now, however my experience with it has not been a good one. Diffeomorphic supports more features and more importantly (for NSFW creators) supports 3rd party genital geografts like New Gens.
Installing the Diffeomoprhic add-on
Installing is the same as any other Blender addon. Download the zip file, in Blender go to Edit -> Preferences -> Add-ons -> Install and select the zip file you downloaded. It should automatically filter to the plugin after the install, just tick it to enable it.
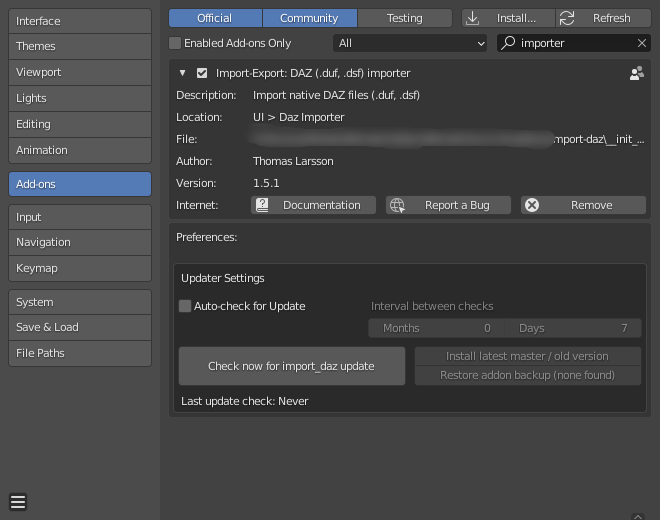
Once you’ve installed the plugin we need to do a little set up. If you head to your viewport and bring up the N menu you will see a new Daz Importer tab. Click that and click the Global Settings button at the top.
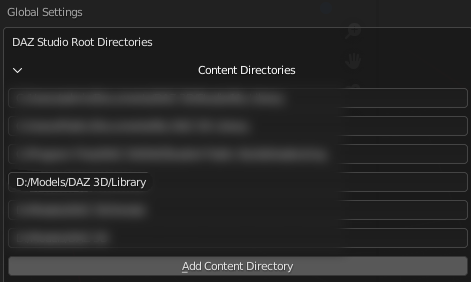
In the window that opens up you should set the directory where you store your Daz content. In my case you can see I have a custom folder (and a few others). I have left one visible to show you an example.
If you are familiar with manually installing Daz content then this path should point to the folder you would extract your Daz content into. It is also the folder that your Daz library is set to in Daz itself.
Automatic Paths
You can do this automatically using a JSON file, check the next section for details if you would prefer that method.
Installing Diffeomorphic Into Daz
The next step is to ‘install’ the script for Daz. I say ‘install’ but we are really just making it convenient to run rather than installing it.
Inside the Diffeomorphic plugin folder, or you can grab it from the zip file if you want, there is a folder called to_daz_studio take the folder you see inside and merge it with your Scripts folder found inside your Daz content folder. For example mine is located in D:\Models\Daz 3D\Library\Scripts. If you don’t have one feel free to copy the Scripts folder into your library folder.
Now we simply need to open up Daz, navigate to the scripts folder in the content library and run the setup_menu script inside Scripts\Diffeomorphic to add the Export To Blender command to the File menu.
Export Paths
If you want you can also export your Daz paths to a JSON file using the save_root_paths scripts and import that into Blender using the Load Root Paths button in the Global Settings
Exporting Props
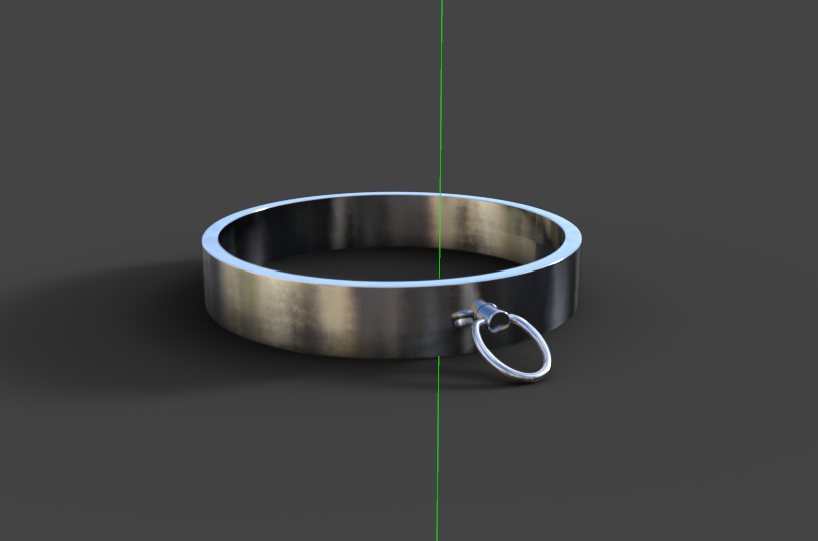
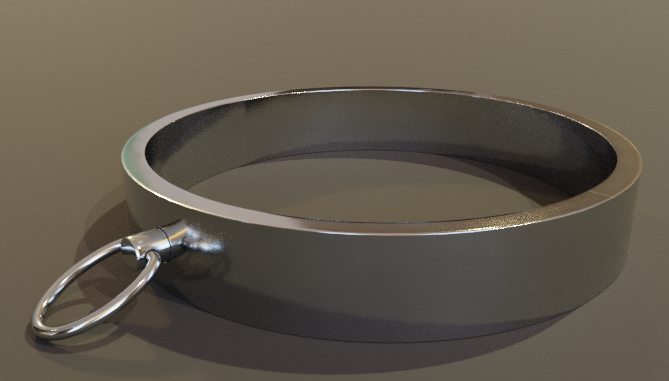
Now that all the set up is out of the way let’s export something and see how it works. I will be exporting this Collar as it is relatively simple (in terms of materials) to start with.
To take this through to blender the steps are as follows:
- Load the content you want to export into a blank Daz scene. You can export multiple items at once, but I heavily advise not mixing characters and environments/props.
- Make any adjustments you’d like to in Daz. This Is generally just applying any alternative materials the prop provides. The model itself is best exported with all morphs disabled or at 0%, just in case.
- Save the Daz scene. I advise making a folder to keep everything in and then a folder per export. Give it a nice sensible name for later.
- Now in the
Filemenu clickExport To Blenderto export a DBZ file. Give it the same name as the Daz Scene and place it in the same folder. Note: This step is essential for character exports - You should see a message after a small amount of time about the export and if it was successful. Click OK to dismiss and you are all done with Daz.
DBZ File Notes
You generally do not need to export a DBZ file for props and environments. It is (generally) only needed for Character exports however it is a good practice to get into so you do not forget and get the horrible ‘DBZ’ error when it is required.
Importing the Prop in Blender
Now for importing your Daz prop into Blender, but first a quick note about workflow.
In general I advise importing Daz props into a fresh Blender file, fixing anything and saving, then append your prop into your working scene. You can import straight into a scene but it is much easier to use a blank file so you can have the prop ready to append at any time.
Now, back in Blender click File -> Import -> Daz Native and in the file dialog navigate to where you saved the Daz scene file previously. If you have gone for 1 scene per folder you may notice two files. One is an icon Daz creates for your scene but you can select either of the files to successfully import your scene.
Before we continue a quick word about the Mesh Fitting options available during import.
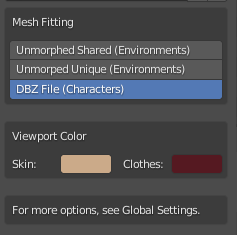
‘Unmorphed Shared’ is useful when you have a lot of items that share the same mesh and materials. It will help save memory and resources for you.
‘Unmorphed Unique’ is useful when you have lots of items with the same mesh but different materials.
‘DBZ File’ is mostly for importing characters which is outside the scope of this tutorial.
For the collar I’m going to select ‘Unmorphed Unique’ as it is a single prop anyway.
A Wild Warning Appears
You may notice a warning appear when importing items. This can be safely ignored, but check the troubleshooting section at the end of this article for more on why it appears.
Using Imported Props
This is where things get tricky. Your prop may look different depending on what it is.
For example if your prop is a static object with no rigging you will likely just have an object. Like this chair.

However you can see the Collar I have chosen to import has a rig attached.
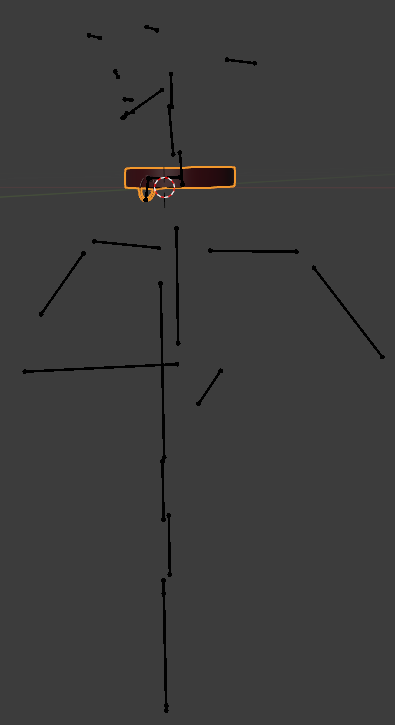
This is because the collar is meant to be fit to a Genesis character and so has parts of the rig to enable it to be ‘fit’ to them in Daz.
If you have a similar prop whether or not you want to keep the rig is entirely up to you. I’ll continue with the collar as an example to give you an idea of how you might remove the un-needed bones.
In my case I am going to remove all of the rigging except for the bones that control the collar. Why? because my model has a different ‘neck’ setup and I will just parent the main collar control bone to my model’s neck bone.
You can see how you might remove the other bones in the video below.
More complex models may require more work, but these are the general steps required.
Imported Prop Materials
For the most part the Diffeomorphic plugin does a good job of translating the iRay materials to Cycles, however you still may want to check things out.
You can see that the collar looks perfectly fine as Diffeomorphic has translated the iRay shader to a Principled BSDF with all the textures in the correct places.
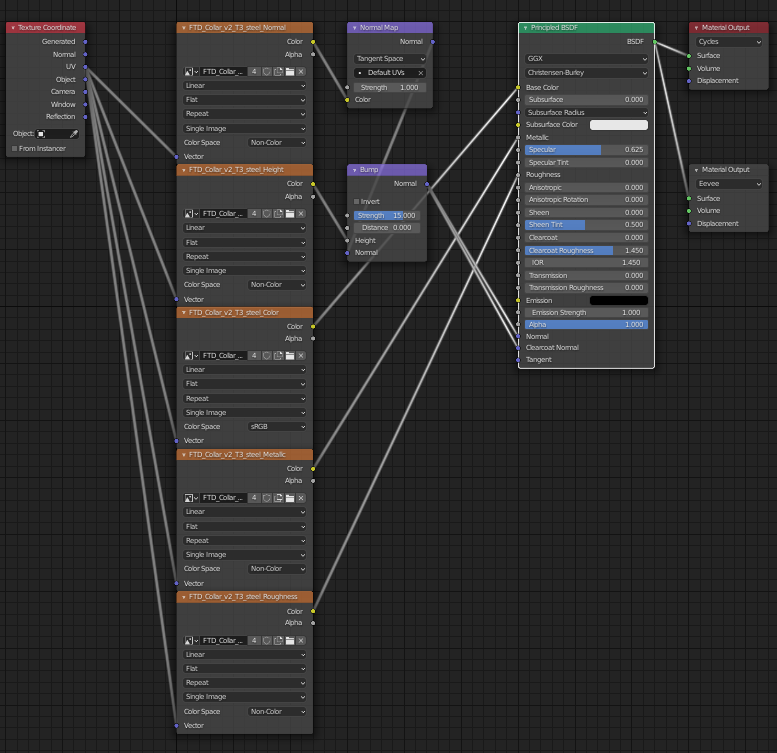
That being said you are unlikely to get an identical result to iRay because the renderers are different. You may need to adjust the maps to get the result you want.
If you want to play around with things you could add a color ramp, a map range node or a math node (set to multiply/divide) to the roughness to adjust its intensity. I whole heartedly encourage you to play around and see what results you can get.
What About Morphs?
So you may have exported a prop that had morphs in Daz and you are now screaming “I need my morphs!” Well don’t panic, I’ve got you.
First it is important to realize that some sliders in Daz are not actually morphs and are instead sliders that control bones. For example the collar I exported uses sliders, but most were controlling bones and so I don’t need to import the morphs as I can just move the bones instead.
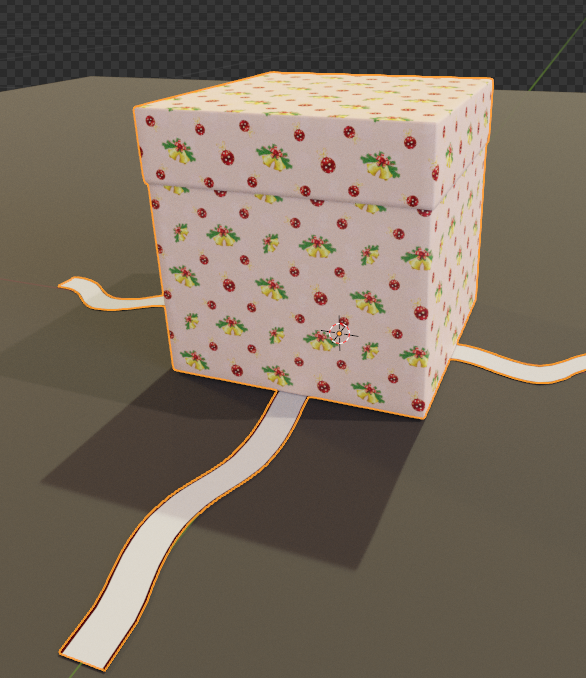
If instead you have something like this Christmas Present:
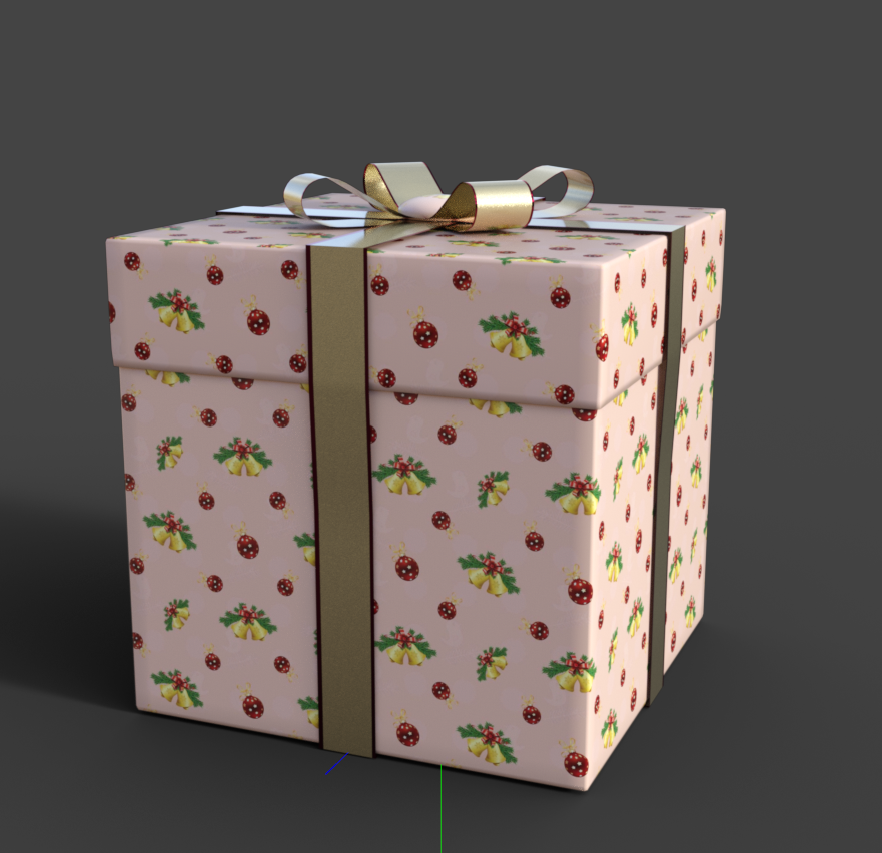
This has morphs that actually change the geometry rather than manipulating bones. In this case they change the height, width, open the ribbon, hide the ribbon, etc.
To import your morphs follow the same process as before to import the Daz prop, but after import select the model that should have the morphs and in the Daz Importer tab (press N over the viewport) click the Import Custom Morphs button.
Save Now!
If you haven’t already please, please save now. Importing morphs can sometimes go wrong and reloading your previous save is the quickest way to restore order.

When you click the Import Custom Morph button a file dialog should open but the path should already be set to the vendor folder where the morphs for the Daz model are held.
You should see a bunch of .dsf files. Those are the files you need to open.
In some cases you may need to go into a few folders, or choose the folder that matches the prop. Try your best to match things based on what you know about the prop if you are presented with multiple folders.
In most cases you can select all of the .dsf files however if you can decipher their names and only import the ones you need, even better.
Once done your morphs should now be added to your model and appear as Shape Keys. Simply use them as you would any other Shape Keys.
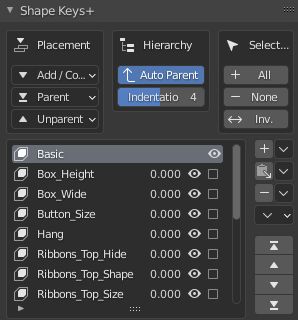
Here you can see I have used the unpack shape key on the Christmas Present.
Wrapping Up!
That’s it. You should have now successfully imported your prop.
Importing large environments or more complex props are generally just a repeat of the previous steps. It is up to you to decide if you need to make any adjustments to the items imported in a complex environment.
Characters are similar in process, but have some additional steps and if you want to make them *cough*NSFW*cough* ready then there are even more steps to get things working. I may see if I can do a tutorial on that at a later date.
Troubleshooting
So you’ve got a few problems? Let’s see if we can answer those here. If not feel free to leave a comment.
Materials look weird!
This can happen when the Diffeomorphic add-on gets something wrong. It happens. This is where a little knowledge of nodes and materials comes in handy as it is pretty much impossible for me to predict what might be wrong.
The best option is to simply head into the material and see if you can see what is wrong. Maybe a image map is attached incorrectly. Maybe a value has been set to a strange value. I’ve seen some weird things before, just look for anything out of the ordinary.
Rigging ‘toys’
You’ve imported a few NSFW toys and they have rigs but you have to pose the bones 1 by 1? Check out my guide on how to add a spline IK rig for that sweet ease of use.
Terrible Viewport Performance
One thing about Daz props is that their geometry can be rather questionable at times. They may be incredibly high poly instead of using a subdivison surface modifier. Other times subdivision will have been added by the importer and if you don’t have ‘simplify’ enabled that could also slow down your scene.
It is a complex subject but if your prop has a high poly count it may be worth attempting to decimate it or trying Blender quad remeshing.
A ‘warning’ comes up when importing!
This is the Diffeomorphic add-on letting you know that your scene settings may not be able to render the prop in an ‘acceptable’ way. In general, when using Cycles, you should increase your Render Properties -> Light Paths values, especially for Transparency and Transmission if you have anything that uses those.
This is a good tip for any render and not just Daz props. Transparency helps for anything that uses alpha maps like hair, leaves, or fur (depending on how they are made). Transmission is mostly for glass like materials.
As an example here is a viewport render of Judy from Cyberpunk with 6 transparency light paths (on the left) and 64 (on the right).
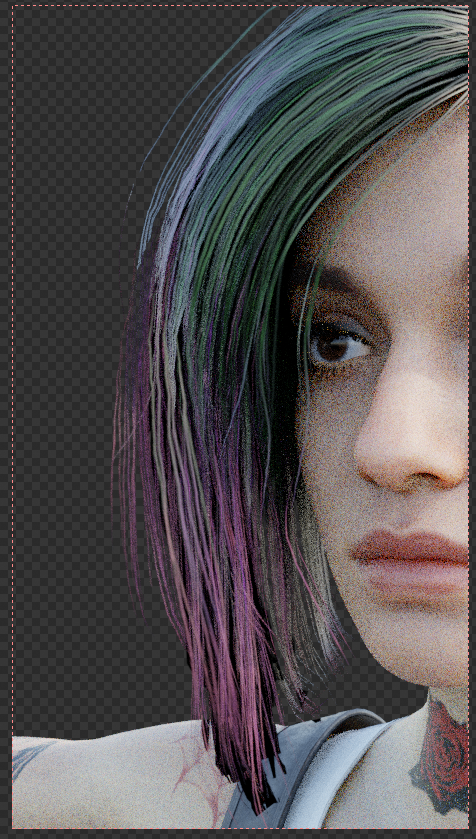
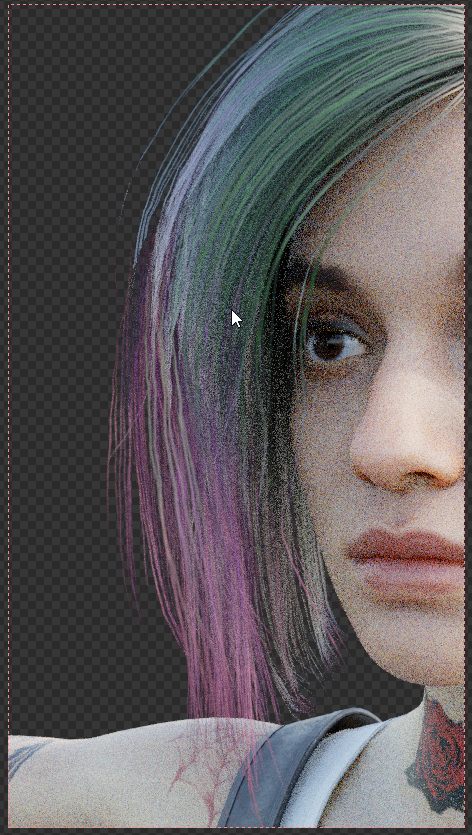
This is an extreme example, but it shows how important it is. The black ‘shadows’ appear because the transparency light paths are set so low they can’t pass through all the required geometry before being ‘culled’.
That’s it. If you made it this far, thank you for reading and give yourself a pat on the back.
I hope this helps, if you have any questions please feel free to ask them and I’ll try my best to answer them. Please be polite or your comment will disappear into the digital shredder.
Did you enjoy this guide?
Please consider supporting me by donating a small amount via Ko-Fi.
TYSM FOR THIS