You have a strange idea involving tentacles, and you have a model, but it has a lot of bones (or maybe none) and you can’t stand the thought of posing all of those bones individually.
Well look no further, I’ve got a great and simple way of rigging a tentacle so you can do ‘things’ with them. Hey, I’m not one to judge. Have you seen my Twitter (+18 only. No, seriously.)?
Hey! Look Here!
I will be using Blender 2.82 throughout this article, but pretty much everything here is available in 2.8x and possibly even 2.79.
First I’m assuming you have a tentacle already. If you don’t there are a surprising number out there on free sites like Sketchfab. If using a pre-made be sure to respect the artist wishes/license. Making one from a cylinder is a fairly simple task assuming you just want a simple smooth tentacle.
Preparing The Tentacle
First we need to do a few things to prepare the Tentacle. Nothing too complicated, but it is best to get them out of the way.
Make sure you have applied scale, and possibly location/rotation. Scale is the most important, it can cause the rigging to break, but location/rotation should be applied too if possible.
Do the rigging in a separate Blend file. It is best to do the rigging with the Tentacle in a Blend file all of its own. This can then be linked/appended into your project later.
Rig That Tentacle
Finally we get to the good part. Rigging. I’m going to assume you have a tentacle with absolutely no bones. If your tentacle has a good amount of bones you can skip to setting up the IK Spline.
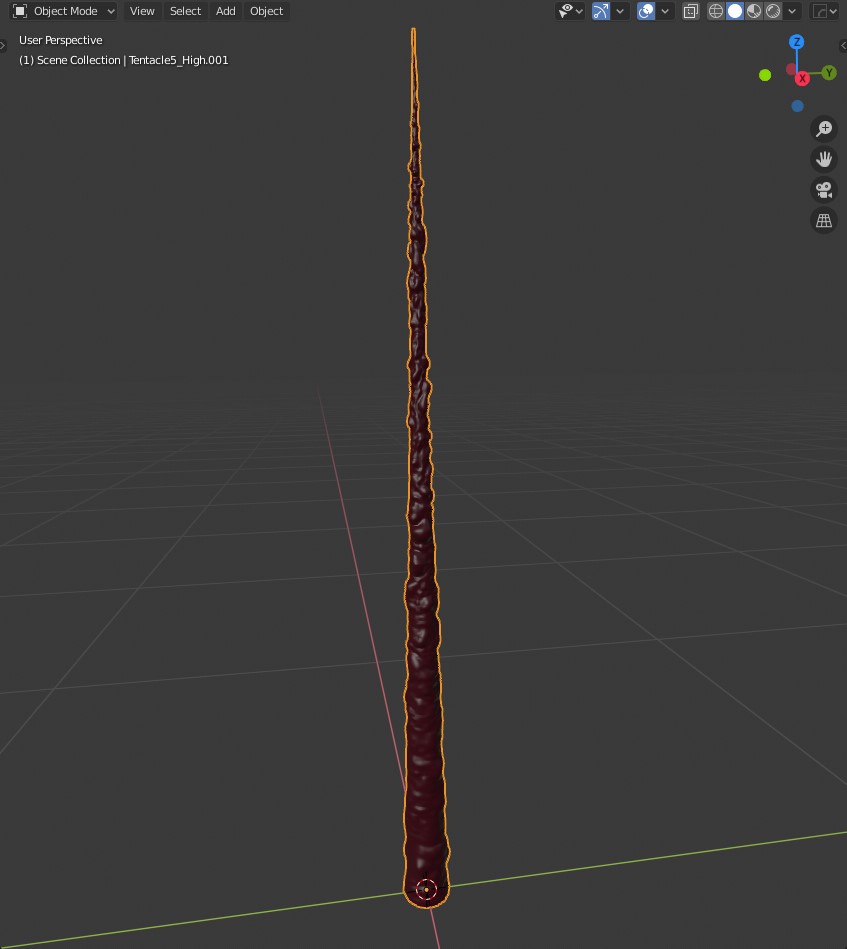
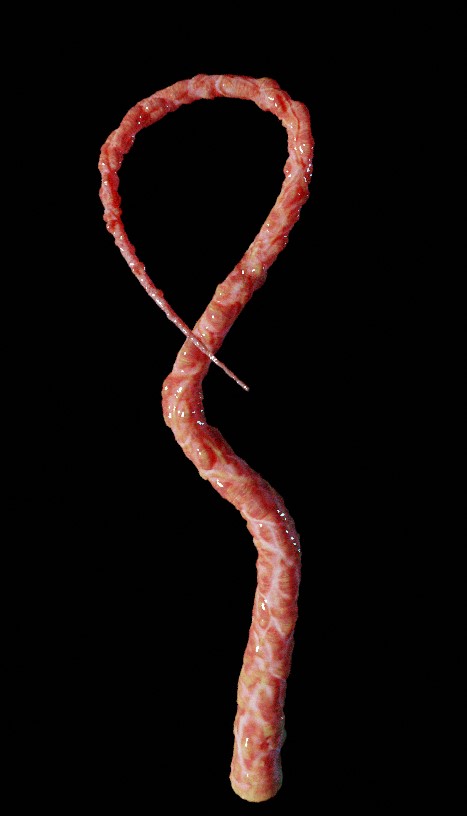
I will be using the tentacle above I ported this over from Daz but this is originally an old Poser prop I bought in my old Poser/Daz days. I imported this as a OBJ so it has no bones so I can show rigging from nothing.
First we are going to give this tentacle some bones. We need a lot of them to get good smooth bends. The easiest way to do this is make a single bone using Shift + A -> Armature -> Single Bone this will give you an armature object (which you need) with a single bone.
With your new armature selected go into Edit Mode and then select the main part of your bone (the whole bone should be highlighted, not just the end).
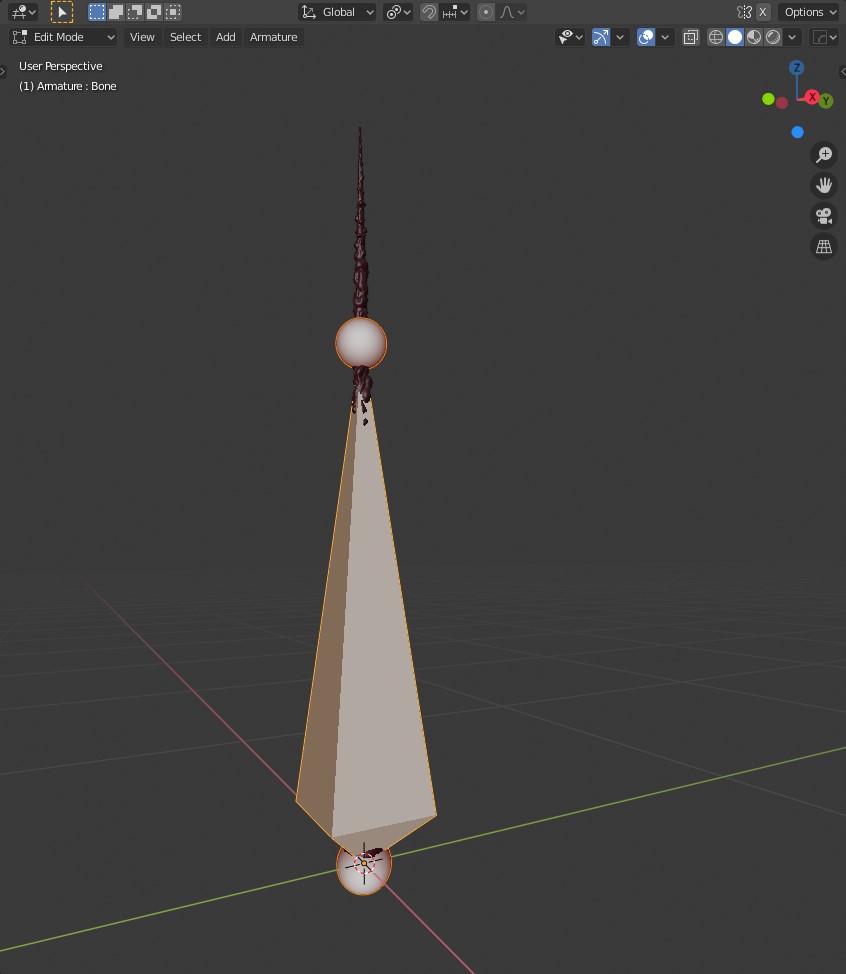
You should have something that looks like this.
Set your pivot point to individual origins. That is the small box to the right of global at the top of the screenshot.
Now scale up your bone so that the tip reaches the end of your tentacle. Switch to wireframe or X-Ray mode if needed so you can see when it lines up.
Important!
By ‘tip’ of the bone I mean the end of the triangle you can see inside the ball when using wireframe mode. It shouldn’t matter too much, but I’ve found using that as the ‘tip’ to give the best results.
Once that is complete we can subdivide our bone. Use Right Click -> Subdivide to do that. In the bottom left of the viewport there should be an options box. Open that up (if it isn’t already) and increase the number of subdivisions.
There is no hard rule for this. The more bones the smoother things should look, but the heavier it will be on your PC and Blender. For my tentacle I subdivided by 10, then once more by 5.
Now to make your Tentacle mesh follow the bones. Come out of Edit Mode and select your Mesh, then your Armature. Press Ctrl + P and select Armature Deform -> with Automatic Weights If you don’t see any errors at the bottom of your window you should be good. If you do, check out the tips at the end.
Improving The Rigging
At this point you are technically done. If you select a bone near the bottom and all bones above it, while in Pose Mode with Individual Origins and Local Transforms turned on, rotate it you should see your tentacle curl nicely.
To be honest though, that would be a real pain to pose. So we are going to make it better. Let’s make a Path. To do that while in Object Mode use Shift + A -> Curve -> Path this will make a path for you.
Now if your path is not in the same orientation as your tentacle you need to fix that. Do some rotations to get it in the right place, but if your tentacle is up on the Z axis then rotating it 90° on the Y axis should do it.
Now we need to move the path so its last vertex is on the origin. To do this go into Edit Mode with the all points of the path selected and move it up 2m on the Z axis. You can then also scale the path down to match the length of your tentacle, but do that in Object Mode then apply scale using Ctrl + A.
At this point, going back into Edit Mode on the path, it may be a good idea to Right Click -> Switch Direction this should prevent your tentacle flipping upside-down later.
Now let’s organize things in the outliner so it is easier to use when we inevitably have 9 tentacles in one scene. I like to have my tentacle organized as shown.
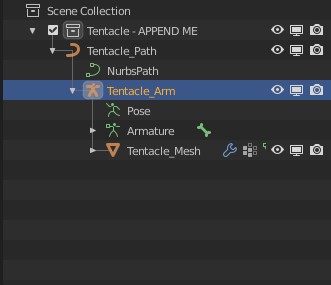
As you can see I have placed everything in one collection and parented the Armature to the new path. This is so if we move the path in Object Mode the tentacle will move too.
Now select the armature and go into Pose Mode then select the bone at the tip of the tentacle. Go to the Bone Constraints tab in the properties panel and add a Spline IK constraint.
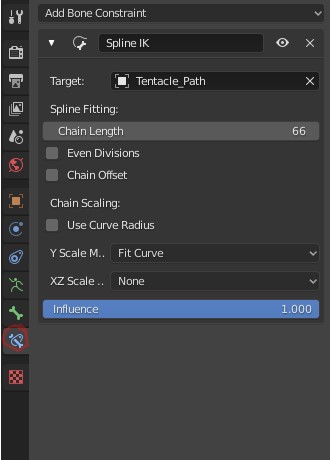
In the settings change the Target to your path and increase the Chain Length to match the number of bones, or slide it up until your mesh stops looking ‘strange’ or moving if you aren’t sure how many bones you have.
If at this point your tentacle is upside-down. Remove the Spline IK, un-parent your path from everything, head into Edit Mode on the path and Right Click -> Switch Direction then parent it again.
If at this point your tentacle looks squashed. Untick Use Curve Radius. Alternatively change XZ Scale to Inverse Scale and then in Edit Mode on your path select all Vertex with a then press n while hovering over the viewport to open the side panel and on the item tab change the mean radius until the thickness of your tentacle looks ‘right’.
This latter option has the benefit of allowing you to change the thickness of your tentacle by changing the radius of a vertex in the path. Great for those pulsating tentacles.
That should be it, rigging complete. Just edit the path and move around those vertices to move your tentacle.
Tips & Troubleshooting
Increasing the Length
First some tips. If you want your tentacle to be longer, you can select the last vertex and extrude a new one from it e. The only thing to keep in mind is the longer you extrude it the more the mesh will stretch to match the length of your path.
In most cases this should look fine, but tentacles on a octopus which has suckers would start to look weird and would be best rigged in another way such as a curve and an array modifier with start and end caps.
Adding more curvy-ness
Sometimes you want to wrap the tentacle around something, or add more curves. If you want to do that in the middle of your tentacle you can’t just extrude. Instead select two vertices where you want another and then Right Click -> Subdivide again you can use the box in the lower left if you want more than 1.
More tentacles!
If you want more tentacles in your scene, and let’s face it, who doesn’t. You can easily get another one by duplicating the collection your tentacle is in. This will duplicate everything and switch the Spline IK constraint to point to the duplicates. Nice!
Heat Weighting Failed – How to fix it!
If you get an error during the automatic weighting process that mentions ‘Heat Weighting Failed’ you should be able to fix it by scaling everything up (by something like 10) and trying again. You can then scale everything down by 0.1 to get to your original sizes.
Tentacle Complete!
That should be it. All done.
There are a few different ways to rig a tentacle, but this is one of my favorite ways due to its flexibility and simplicity. I may revisit the subject later to show how to make a more complicated one, but for now I hope this helped.
Now go out there and conquer the world with your new found tentacle rigging powers…
Be First to Comment