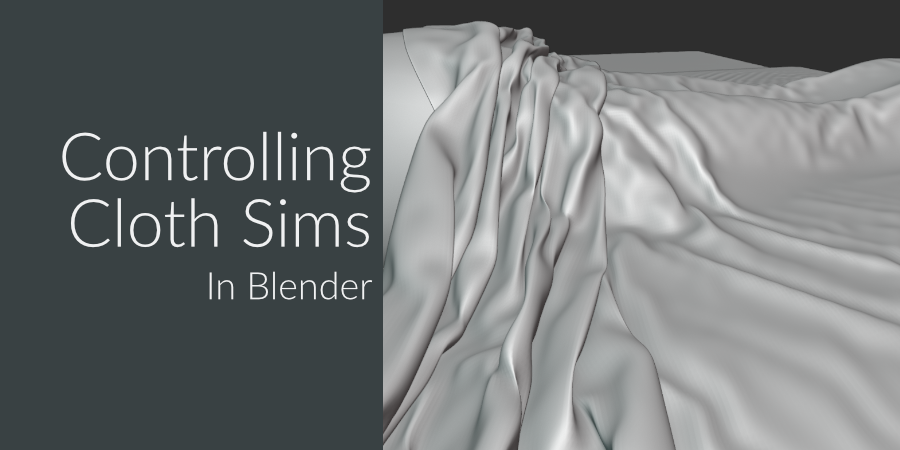
In today’s post we are going to look at how you can help control your cloth simulations using hooks, and how to release them on demand.
This can be a great solution to use when you have a character that needs to pull or hold a simulated piece of clothing, or for my case which was placing a blanket on a bed in a natural looking way.
IMPORTANT
I am assuming a good knowledge of Blender during this tutorial, at least in terms of the UI and where things are. Cloth simulations can be tricky so knowing your way around Blender first will help a lot.

Making The Cloth
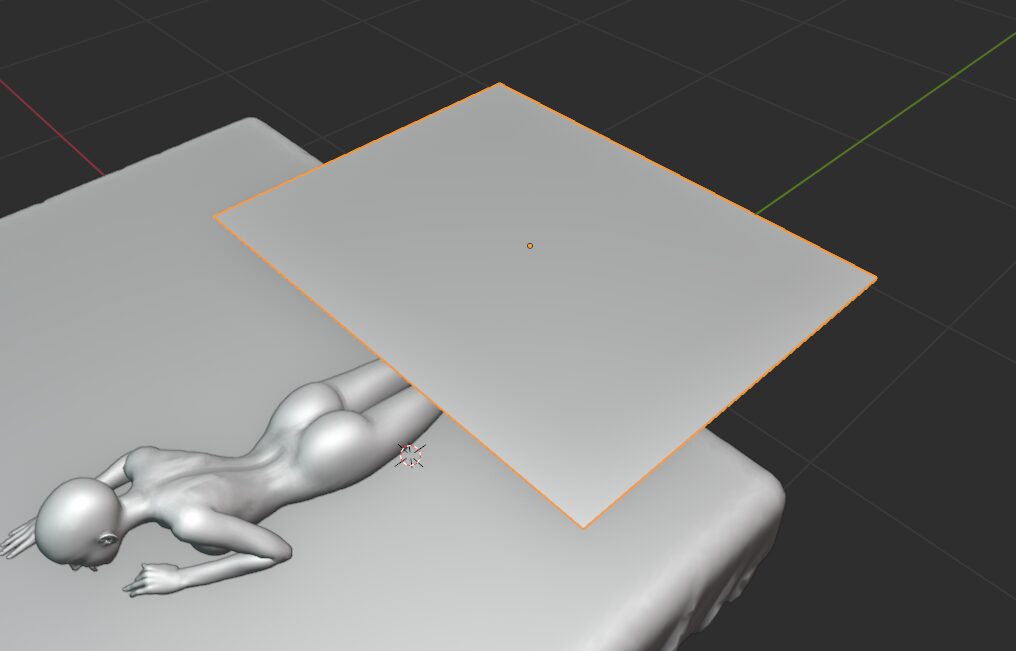
This will depend entirely on your scene. You may already have a piece of clothing, or you may want to create it, but in my case I’m going to use a simple plane and size it appropriately for a blanket.
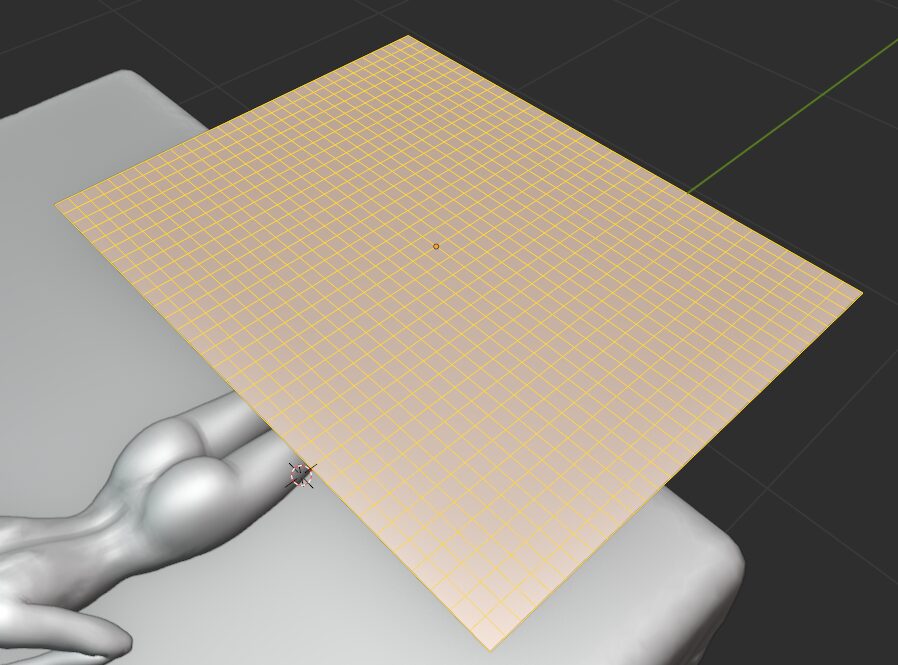
You’ll need to make sure your geometry has enough polygons too. How much is enough? Well, that’s a difficult question. I recommend an all quad mesh and for reference here is what my plane looks like in terms of polygons.
I wouldn’t add too many as you can add more to the simulation by subdividing again, or using a subdivision modifier later. Do note that I find using a subdivision modifier to add geometry before the cloth modifier is slower when running the simulation, but your mileage may vary.
WARNING
Having simplify enabled and set to 0 from this point on could cause problems. Blender uses the geometry visible in the viewport for cloth simulation so if you apply a subdivision surface modifier but have simplify set to 0, you are not actually adding any geometry to the simulation.
Adding Hooks
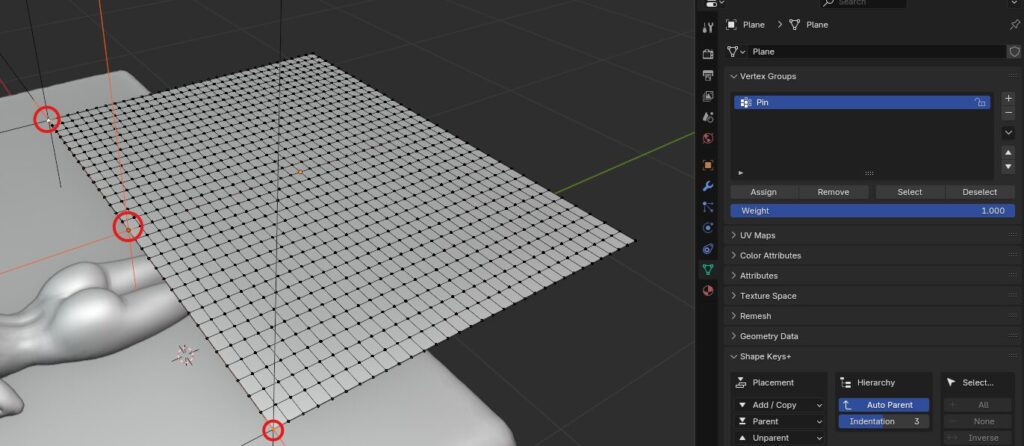
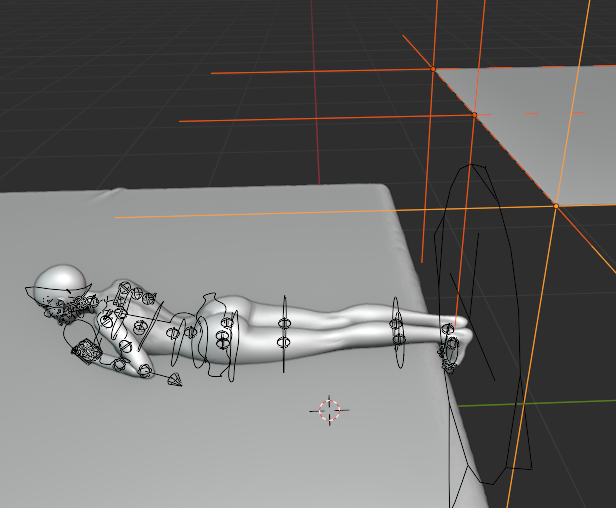
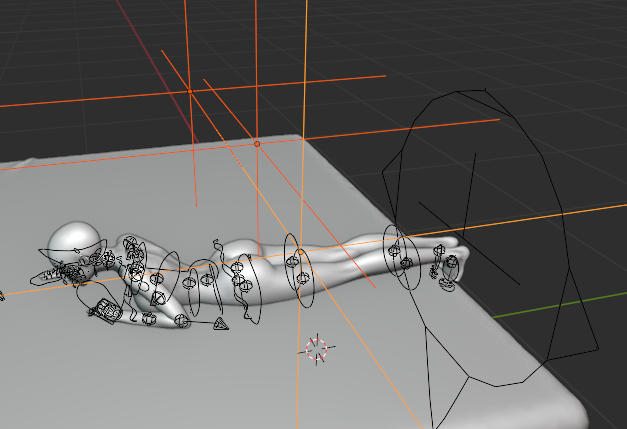
To control the cloth we are going to use hooks. There’s a super simple way to make them in blender. While in edit mode of your object just select the verticies you want the hook to be attached to and press Ctrl+H then select Hook to New Object.

This will automatically create an empty and hook the selected verticies to it. I’m going to do that with two corner verticies and a center one so I can pull the cloth along.
We also need to make sure the cloth simulation ignores these verticies or the hooks will not pull them along correctly. To do that reselect those verticies and assign them to a vertex group. I’ve called mine Pin.
Adding Cloth Physics
Now we can add cloth physics to our plane. Head to the Physics tab and add a Cloth modifier. We can use the default settings for most things, but we do need to change one or two things.
First go down to the Shape section and select your vertex group as the Pin group. Then in Collisions turn on Self Collisions. You’ll also want to reduce the Distance for both Object and Self Collisions to 1mm which is the smallest you can go. We’ll leave everything else at default for now.
NOTE!
Also remember to add collision to anything you want the cloth to interact with. You can leave the default settings for now.
If you now play your timeline and move around the empties you can drag the cloth around and it will interact with any collision objects and be dragged around by the empties.
Remember to hit Esc or right-click when you are finished to put the empties back to the correct location. We’ll need them there to animate our movement properly.
That’s essentially it. We can now animate the empties to pull the cloth. In my case I’m going to use it to have the cloth pulled onto Tifa’s legs. This gets some natural folds instead of having to sculpt it.
Now that we have the basics out of the way I’m going to show you the rest of the process I went through to hopefully give an idea of how this workflow works.
Animating the Hooks
First I’m going to animate my Hooks (empties) to position the cloth as if it were being pulled over Tifa’s legs.
You can, if you like, set the initial keyframe (Using i or k) then play the timeline and move the empties, then set a keyframe while it’s playing. Honestly I’m not a fan of that method but if it works for you, go for it.
Tip
You may want to disable the cloth simulation by pressing the small TV/Monitor icon on the cloth button in the physics section while setting keyframes. It’s usually fine but if you have a fairly dense geometry it can cause some issues as you jump around the timeline.
Now, you could just play the timeline to see your simulation, if your geometry is not too dense it should play quite well. However I do recommened baking under the Cache section of the cloth physics instead. It is generally more stable and quicker as Blender doesn’t have to process the viewport preview as well.
Fine Tuning Your Simulation
Now you should have a simulation that you can scrub through on your timeline. If you’ve looked at it though and are thinking: “But… It’s so low poly!” You are probably correct.
You can see the cloth is not very high poly and since I want some nice folds we aren’t really going to get anywhere with that, this is where we start to have to answer some questions:
- How much time are you willing to spend tweaking?
- How much time are you willing to spend simulating?
- How detailed does it really need to be?
Those are just some of the questions you’ll need to ask yourself. Don’t be like me and start your render on a Monday only to find yourself finishing the cloth sim on a Friday due to all the tweaks you’ve been making.
Increase Poly Count
First up we should subdivide our mesh a bit more. I’m going to do it twice, in edit mode, but feel free to use a subdivision surface modifier.
I’ve set the cloth to shade smooth and it is better, but I’m still not too happy so I’m going to add 1 more level of subdivision but I’ll use a modifier before the cloth simulation.
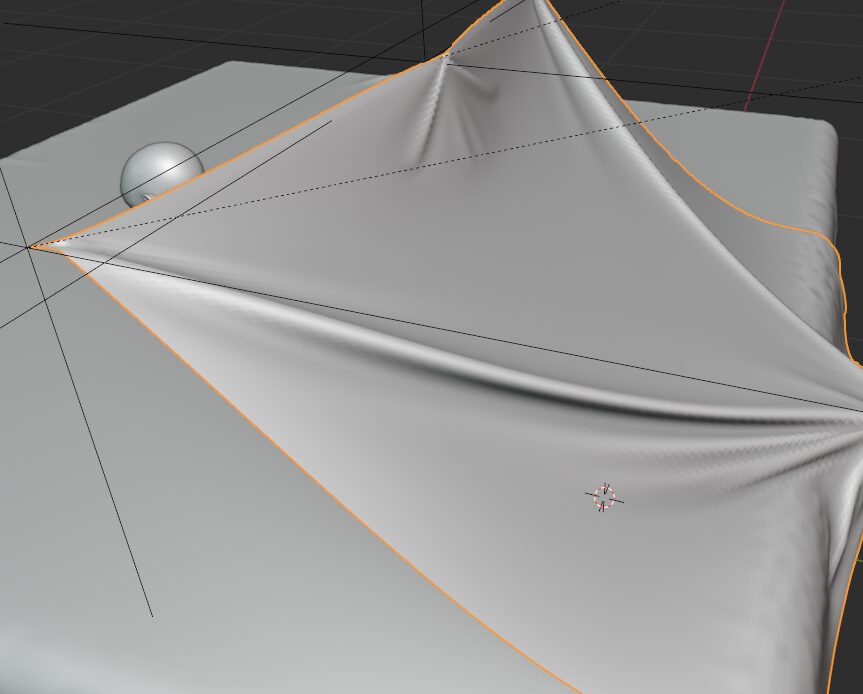
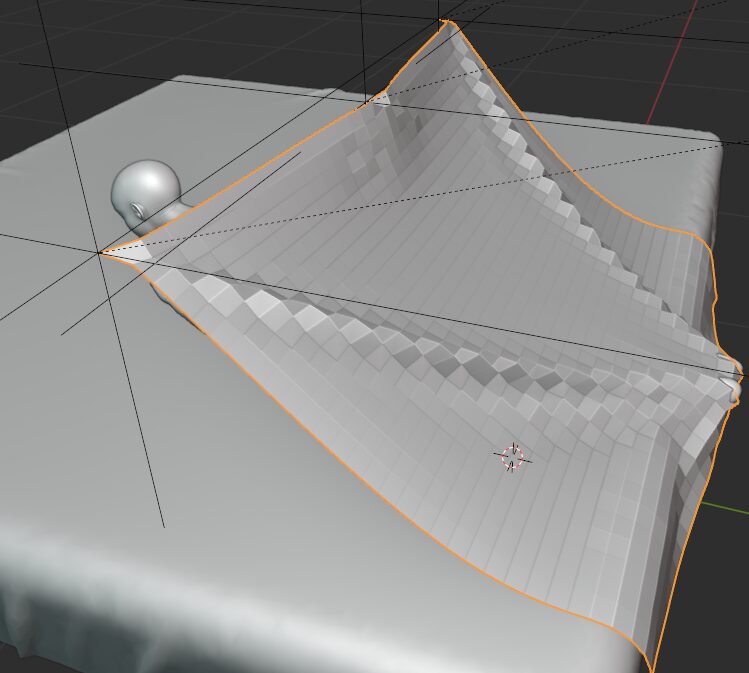
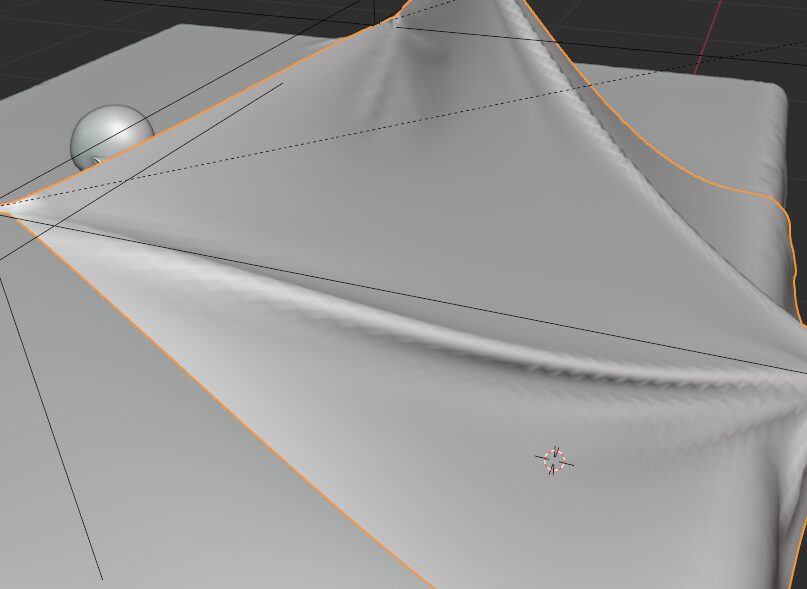
Okay I think this looks good, we can see some nice folds appearing from the empties dragging the cloth and the friction of the bed.
Dropping the Cloth
I mentioned earlier that it would be great to get some natural folds by dropping the cloth from the hooks, to make it look like the blanket was pulled over Tifa’s legs. Let’s do that now.
This seems tricky, and it is not very intuitive, but it’s actually very simple to do. The general idea is to have Blender remove the weights from our pin group so that the verticies in the groups are no longer pinned to the hooks. To do that we use a Vertex Weight Edit modifier on the cloth.
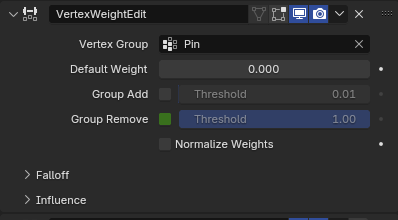
All you have to do is set you pin group as the ‘Vertex Group’ and then set the Group Remove Threshold to 1, keyframe the checkbox ‘Off’ the frame before you want to release the cloth, then keyframe it ‘On’ the next frame. This essentially ‘turns off’ any weights with a value of 1 (red in weight painting).
Note
Because we set the Threshold of the Vertex Weight Edit to 1 this will only disable any weights that equal 1. If you are simulating something else and have different pin weight values you’ll need to adjust the settings to suit your scene.
I’m pretty happy with how this worked out. Important to note is that this was simulated with both Quality Steps and Collision Steps set to 15. Everything else was at the default settings (except the collision distance which is 1mm).
You may also notice Tifa’s feet are pointed toward the bed, this is intentional. Small objects with gaps, such as fingers and toes, can easily cause issues with Blender’s cloth simulations, so I purposefully pointed them inward so the blanket did not catch as it pulled over her feet. I just wanted to point that out in case it helps.
Finishing Touches
All I’m going to do is add a solidify modifier with a thickness of 0.6mm and a subdivision surface modifier. Both are placed after the cloth simulation.
If you don’t need the animation, I’m using this in a still, then you can apply the cloth modifier as a shape key or you can just apply it to the mesh.
IMPORTANT
Do note that you will need to apply any subdivision surface modifier that is before the cloth simulation, or it will not apply correctly. This is why I generally add subdivisons in edit mode to prevent my terrible memory tripping my up. Also remember to remove the hook modifiers.
That’s it. We are finally done. You can use this technique to create quite complex cloth simulations so feel free to take this example and run with it.
I’m definitely not the first to come up with this method, but I feel like I only ever see this in YouTube videos and using the Vertex Weight Modifier to release the cloth I found in an old forum post on Blender Artist. So I hope this helps those who prefer something in the classic blog format.
Be First to Comment