This tutorial is somewhat an expansion on my previous post about making a Spline IK rig for a banana.
I recently helped a friend by applying a rig to a… Adult toy model they wanted to use. Since they don’t want to bug me to rig a model in this style each time I’m making this ‘guide’ to show how I did it. I’m posting it publicly in the hope it will help others too.
Pre-requisites
As usual there are some things you already need to have before you can do this.
A Model – NSFW or otherwise. This rig is designed to have the advantages of using curves but being able to be controlled by two bones to make things easier to control.
A Rig – You model should have a basic bone rig, the more bones the smoother deformations will be. I’ll do another tutorial on how to make a basic rig at a later date, but there are a lot of guides on YouTube. Both the model and rig should be straight if possible and in their ‘rest pose’.
Time & Patience – Rigging can be a pain and complicated. Take your time and relax. This rig isn’t to difficult to setup so you can always start again without too much of a set-back.
Hot Tip!
Thanks to Pickledude in the comments for pointing out that if you are working with an existing rig (or even just a scaled object) you should probably apply the scale and transformations before continuing.
Making the Curve
First we should make our Curve object. Create a Bezier curve. Don’t worry about the shape for now. In edit mode grab the first point and line it up with the root/head of the first bone.
Woah There!
The ‘first’ bone is the bone that starts where you’d like the spline control to start from. It is important to work that out now as it is a little awkward to change later.
You can use the curve normals to figure out which is the first point. The ‘arrows’ will point away from it.
An easy way to move the point to the right location is to use the 3D cursor. In pose or edit mode of your rig select the bone’s root/head and use ‘3D Cursor to selected’ (Shift+S). Then go back to edit mode on your curve, select the point and use ‘Selected to 3D Cursor’ (Shift+S).
Now you want to move your first point (at the end of the normals) to be ‘in line’ with that point. A good method is to repeat the positioning with the last bone in your rig and then move the point out a good distance along the same axis as your model.

You will then want to select both your points and subdivide to get a third in between. Make sure the last two points are past the ‘end’ of your bone rig. If your curve isn’t straight align your curve handles by right-clicking and using 'Set Handle Type' -> 'Automatic'
Empty Controllers
Next we want to make some ‘controllers’ using empties. I’m using ‘Circle’ empties, but you can use any empty you like.
You can use snapping set to ‘Vertex’ or the 3D Cursor to position your empties, but you want to place the origin of each empty on the same spot as each point in your curve.
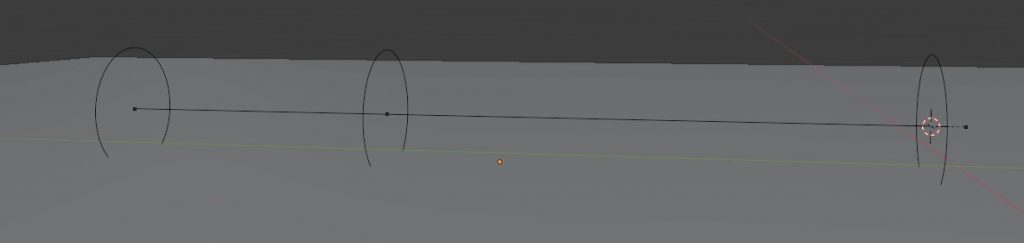
Note: Please ignore that the empty on the right does not line up with the point. You should try to make sure your empties do line up to prevent problems.
Hooking Empties
Now we want to use hooks. These allow our empties to move the curve’s points. Here is the process.
- Enter edit mode on the curve.
- In the modifiers panel add a ‘hook’.
- Select an empty in the object box. The select the matching curve point in the viewport.
- Press the ‘Assign’ button.
Repeat these steps for each empty, make sure to deselect between each hook to avoid hooking two points to the same empty.
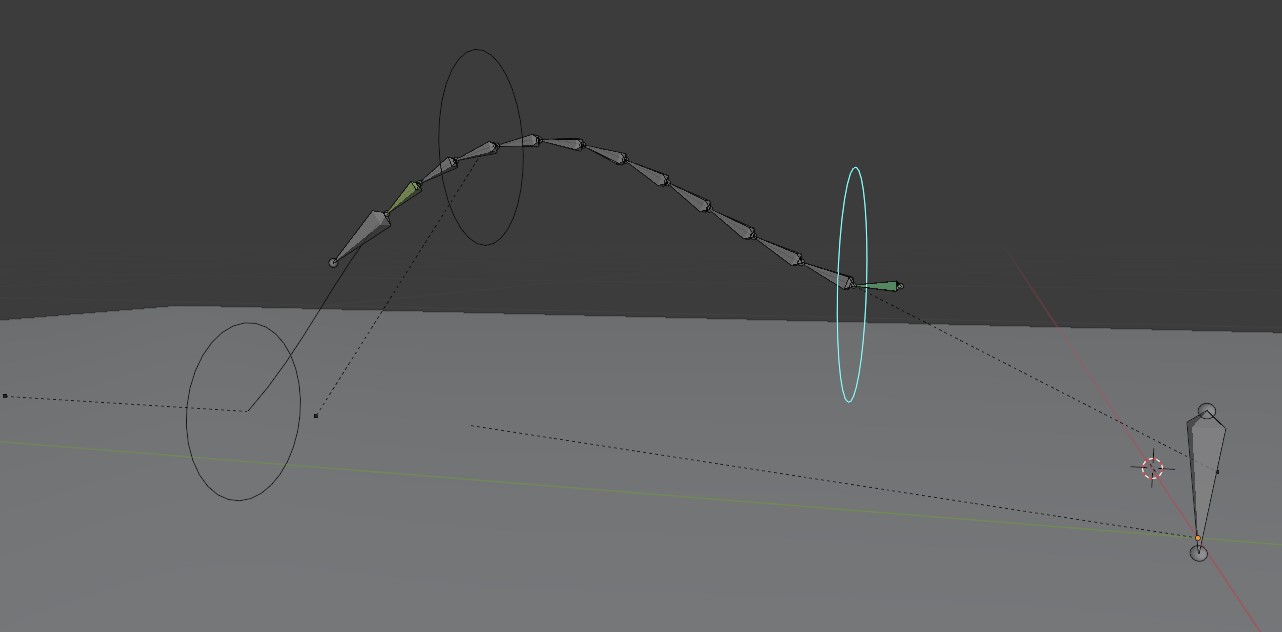
Adding Spline IK
This is where things can be tricky because it depends on your rig. Here though I will be missing the ‘tip’ bone so it can be controlled manually so I’m selecting the second bone down.
Now with that bone selected go to the bone constraints. Add a Spline IK. Select your curve. Increase the ‘chain length’ to reach the bone your curve ends at. Your model will likely distort horribly until you do. Also make sure ‘Use Curve Radius’ is checked and ‘Bone Original’ is set for both scale modes.
At this point you are technically done. If you move your empties in object mode it should move the model. However it’s a bit of a pain having to switch between Pose and Object mode so let’s add some bones so we can control the empties while in pose mode.
Parenting Bones
In edit mode of your rig add a new bone and line up the head/root with the center of your empties or the points of your curve. Selecting the entire bone, scaling it down and using vertex snapping should work.
Do this for all three empties. Now for the complicated part. In object mode select your empty, Shift click select the armature, enter pose mode, select the bone that matches your empty. Now ‘Ctrl+P’ and choose ‘Bone’ to parent it.
Now if you move the bone your empty should move to, which should also move the rig/mesh. Do this for the remaining empties/bones.
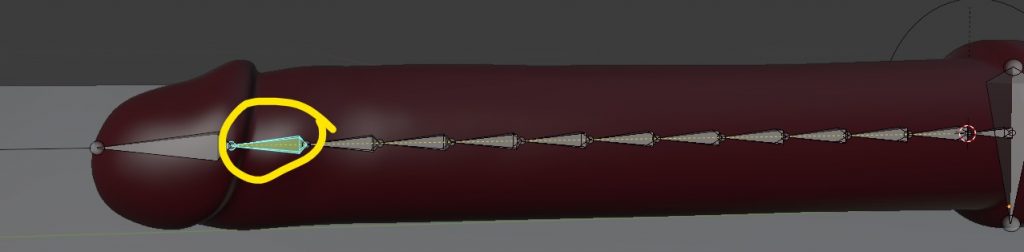
Making Bones Pretty
To finish things up you can make the bones look like the empties. Best way to do this is to make a ‘circle’ mesh resize it and put it in a collection called ‘Widgets’. Now select one of your bones and set the ‘custom object’ found in ‘custom shape’ in the Bone Properties to that mesh object.
Tick scale to bone length and use the ‘scale’ to change the size if it is too big or too small. If the orientation is wrong you can modify the mesh object while in edit mode.
Cleaning up
That’s everything complete. With that you should have an object fully rigged and ready to use. Feel free to modify that as needed, it is probably by no means the best method or the only method but hopefully it helps.
Base Tips
If you have a ‘toy’ like mine and you have purposefully stopped the spline IK short of the base you might have trouble moving the base with the rest of the toy. You can solve this by using a ‘child of’ constraint on the ‘base’ bone and childing it to the first spline IK controller.
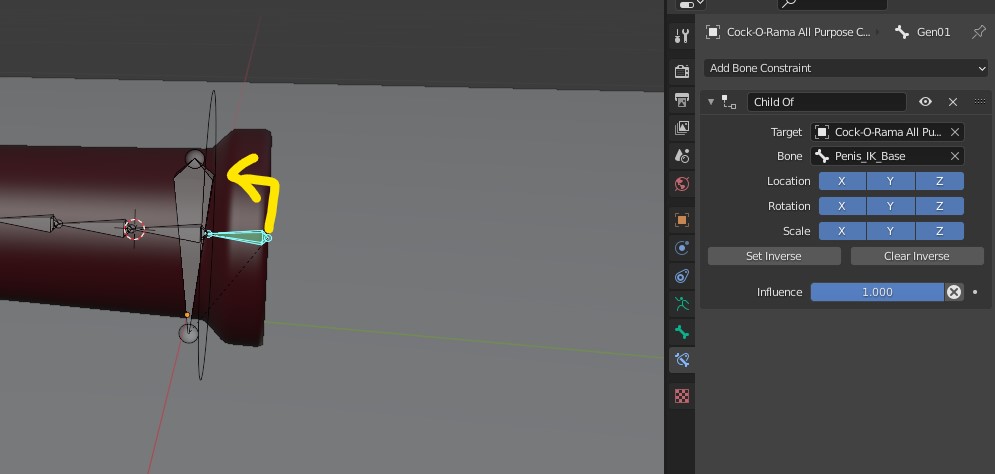
This may only be useful in my use case but I thought it was worth mentioning.
I hope this helps in some way. It was probably better to do this in video format than text, but I would mess everything up and have to do a million attempts so hopefully this will do.
If you have any questions use the comments below or catch me on Twitter just beware my Twitter is very very NSFW.
I’m loving these tip and tuts. It’s hard to find rigging tuts especially for smut. Would you happen to have a blend for these type if rigs? I am finding that I am running into several problems when I attempt to replicate 3 of these tutorials .
Thank you!
Please ignore my previous request. After troubleshooting I realize that most problems were solved when the dick has an applied scale. I was working with a full body armature and the whole armature was scaled up and transforms weren’t applied.
Hi!
Yes, if you are working with another rig or with curves, unapplied scales can cause a wide variety of issues. I’ll add a note to the article to mention that it is a good idea to make sure scales/transforms are applied.
Thank you for your support in your previous comment. I’m just glad they are helpful. My host doesn’t allow explicit content so it’s a little bit of an extra challenge to make some of the tips/tutorials I’d like to, but hope they help in someway.